Fresco Painting Techniques
The history of fresco painting techniques
How do you paint a fresco?
Frescoes are not regular paintings. Pigments are applied directly on a fresh plaster (calcina) base, while it is still wet and without any binding agent. By doing so, colors retain their vibrancy and last longer, remaining beautifully vivid.
Painting a fresco is not easy and it requires enormous skills, even for the most talented of artists: work needs to be completed before plaster dries out or pigments hues will change, loose their brightness and may become more prone to spoiling. For this reason, frescoes are usually made piece by piece, one little section at the time: this way, the risk of plaster drying while the artist still works on the painting is minimized, and time can be spent to focus on details and color nuances.
This little introduction reveals the secret behind the name fresco, or affresco, if you fancy using the Italian word. Fresco means “fresh” in Italian, and affresco comes from the locution “a fresco,” which means “on something fresh”, that “fresh” being the plaster. The etymology of the term comes from the very technique used to produce the paintings.
Even before modern languages were born, the terms used to indicate a fresco all belonged to the semantic field of “the fresh and the wet”.
The very word used by the Greek to indicate paintings made on wet, freshly applied plaster, meant “on something humid”, which corresponds exactly to the Italian and English name for it.
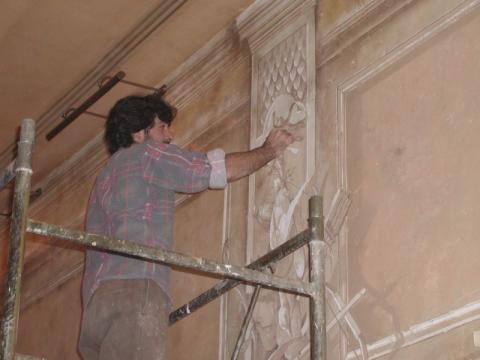
Above: Sergio Bonometti painting a Fresco in a restaurant hall
During the Renaissance, fresco techniques were distinguished between buon fresco (good fresco) and fresco secco (dry fresco). Using the fresco secco technique meant to paint on a dry plaster surface with pigments bound to the surface itself with a subtance, usually caseine or glue based. Color binders were not needed, on the other hand, with buon fresco (which is what we commonly know as frescoes still today), because pigments were applied directly on wet plaster: this meant the colors would "stick" to the wall through the wetness of the plaster and would penetrate it.
The chemistry behind it? While the plaster dries, it creates a form of calcium carbonate which incorporates pigments within the plaster itself. Because of this chemical reaction, pigments, which always came in a dry, ground form, only needed to be diluted with water, and nothing more. The fact colors and plaster become one and only through this procedure is also the reason behind the resiliance of buon fresco when compared to other forms of wall painting, such as murales and dry fresco.
During the Renaissance, it became customary to prepare a cartoon or a drawing of the same size of the fresco to facilitate the organization of the work and the painting itself. This was then held up against the intonaco (coat of wet plaster) and colored dust or pounce was applied through perforations to transfer the full design to the wall. A large fresco therefore was made up of many small sections, each corresponding to the amount of painting that the artist could complete before the plaster hardened. The sections were planned in such a way as to make the joinings as inconspicuous as possible.
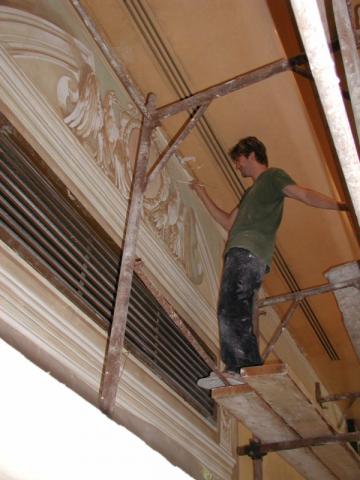
Above: Painting a fresco for a client
Fresco painting does not permit as much blending of colors as oil painting does, but it provides clear luminous colors, and its endurance makes it ideal for majestic and decorative paintings. However, since the technique is appropriate particularly for dry climates it has been used only rarely in Northern Europe. There has been little change in the fresco techniques since it was brought to perfection in the XV century, by the great masters of the Italian Renaissance.
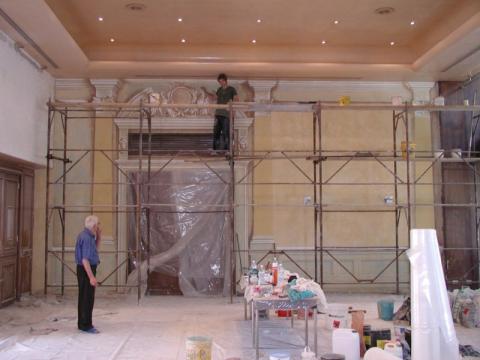
Above: Painting a Fresco for a client
While there are some discordant opinions about whether fresco techniques were actually used in Ercolano and Pompeii, to create what is today famous as Pompeian styel wall art, it is clear that the glorious tradition of true fresco painting in Italy was initiated by Masaccio. This exceptional artist used all the power of his educated and ingenious talent to fix on the walls of the Cappella del Carmine in Florence, a complex set of images considered a true masterpiece of this technique.
His works inspired subsequent artists including il Ghirlandaio, Pietro Perugino, Leonardo da Vinci, Michelangelo and Raffaello, all painters of the highest order, who conferred nobility to Italian art.
How a fresco is made
The principal elements for a fresco are the wall, an underlying 'brown' layer of plaster (arriccio), the thick layer of outer plaster (intonaco), lime (calce), sand and water. First of all, the arriccio, or base plaster, is created by mixing lime and sand, then applied to the walls. The arriccio is normally about 1 centimeter thick, but it can, in some cases, reach a thickness of 3-5 centimeters, especially when more complex, ornate and heavier decorations are to be applied.
Upon the arriccio, a mix of weaker lime and finer sand, called intonaco, is spread. The layer of intonaco is always thinner than the arriccio. Because purity and quality of ingredients is essential to fresco painting, the water used to mix pigments is incredibly important, too.
The pigments used for fresco paintings must be finely ground and some consideration on their use need to be made. We have already mentioned that it is thanks to a chemical reaction between pigments and lime that colors are fixed on the wall, creating what we call a "fresco painting". This very chemical reaction, however, does not allow to use colors the same way as in oil or tempera paintings: the lime base of a fresco is very alkaline and many pigments do react to this. However, there is a wide range of colors which are alkaline resistant and can be used for fresco paintings. For application, the colors are diluted with water. The density is correct when only a few drops fall off the brush which has been immersed in the paint. Obviously, wet colors are much darker and tend to lighten as they dry, thereby adding complexity to the process.
To facilitate the application of pigments to plaster, each needs to be mixed with water in small vases. This must happen at the same time for each color necessary to complete the fresco.
Also, jugs of water must be ready for the immediate rinsing of the brushes: this needs to be done to maintain the colors clean and avoid hue modification. To obtain a perfect hue on wet plaster, the wet pigments must be of a very dense consistency and need to be applied thickly: this allows to create deep, multi-tonal colors.
We said that a fresco needs to be painted in sections, because colors must be applied on fresh plaster, which means that the painter has to be fast... and precise, because touch ups on dry plaster are bound to be very visible. Whenever it appears that the color has not taken, it often means that the work needs to be suspended because the plaster has hardened to the extent it is no longer absorbant.
Last, but not least, there are some golden rules a fresco painter always has in mind while working: light colors should never be applied on darker ones, and dark hues should never be used on an area which is supposed to be light. In case of mistakes, the area needs to be washed and, if possible, some extra plaster should be applied, then painted upon.
From a distance, colors on a fresco should always look bold and strong, because lighter hues are usually not visible. The colors on a fresco change while drying, of course, and will reach stability after an average of three weeks of drying.